Boosting AWS Lightsail Performance with Swapon to Save Your Low-RAM Instance
Jul 24, 2024
•09:55 PM GMT+8

Have you ever experienced reaching high CPU burst loads on your AWS Lightsail instance, causing it to become unresponsive? I'm here to guide you on how to improve your instance with a tweak on your server configuration.
Managing server performance on AWS Lightsail can be challenging, especially when working with instances that have limited resources. In my case, the specifications on my server are
- 1GB Ram
- 2vCPUs
- 40 GB SSD Disk
- 2 TB Transfer
I recently encountered high CPU utilization, primarily caused by memory spikes during remote development sessions. This issue led to frequent server unresponsiveness, impacting the downtime of my web application. Instead of purchasing costly memory upgrades, I discovered an effective solution using Swapon to manage memory more efficiently. In this post, I will share how I resolved memory spikes, maintained optimal CPU burst capacity, and improved performance without incurring additional costs.
The Problem
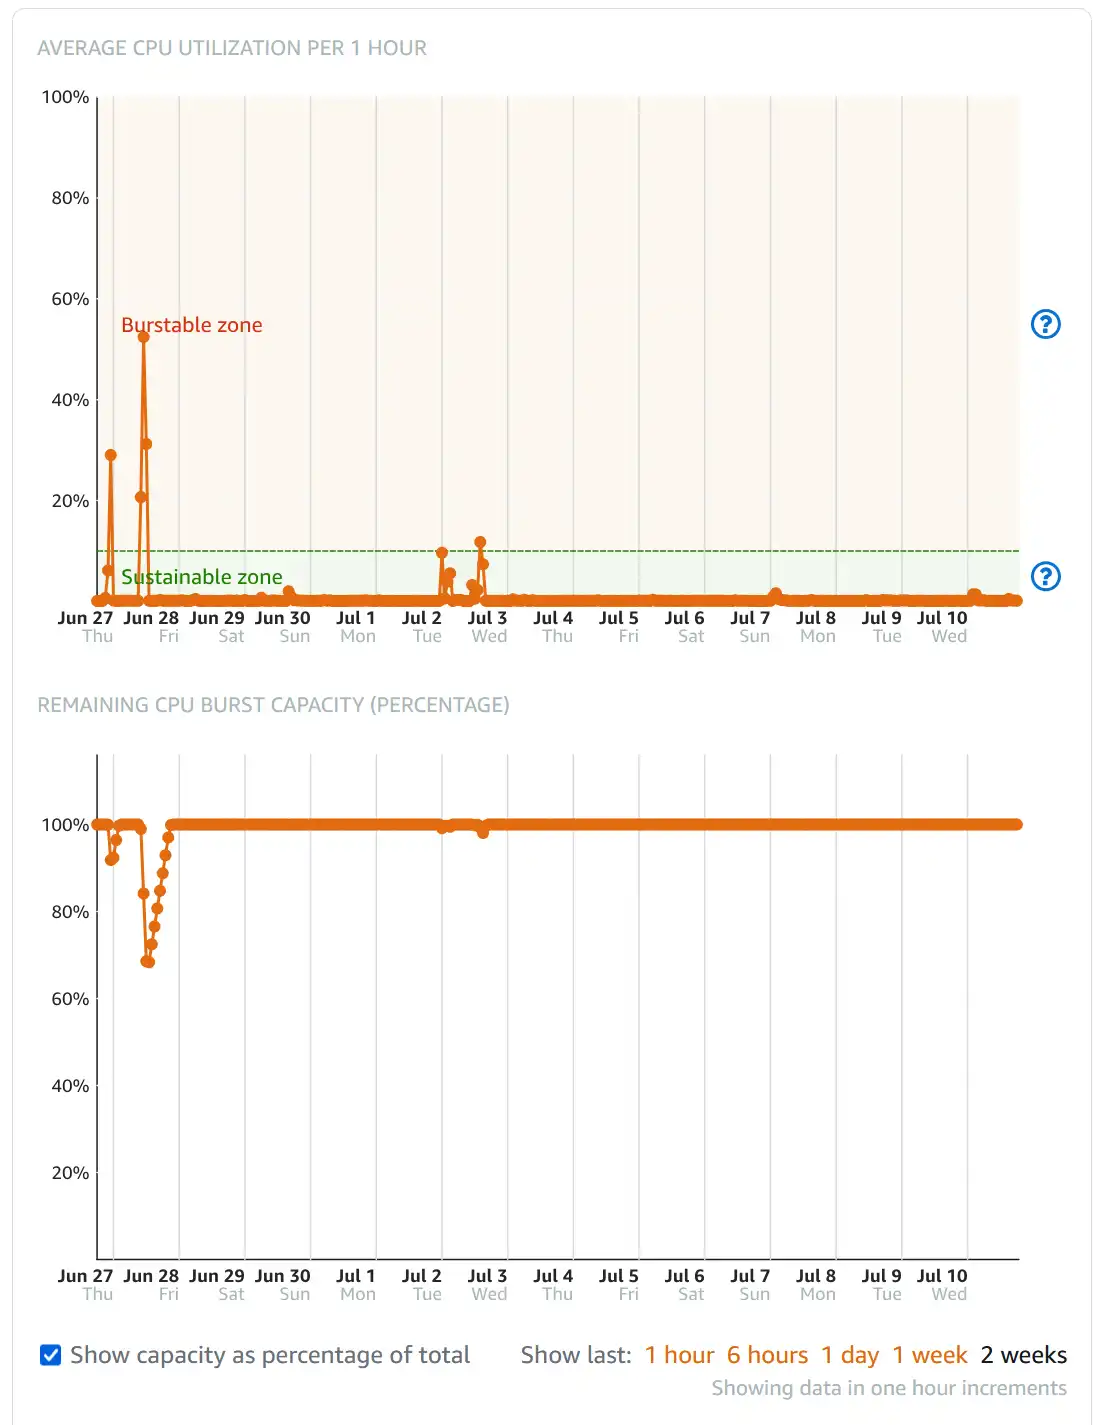
As shown in the graphic below, the metrics of my server instance indicate spikes in usage. When these spikes occur, the server may become unresponsive, and your web application might become inaccessible.

Previously, I would restart the instance because I could not access it during these times. The reason for these spikes was that I used Visual Studio Code's remote development feature to review and develop my blog site. I noticed that these spikes occurred every time I engaged in remote development.
The Solution
Exploring Options
Upgrading the server's memory will incur additional costs, approximately $5 for 2GB of RAM and $24 for 4GB of RAM. Please refer to this link for pricing details. Since the only application running is a web application that mainly retrieves and displays information, I have decided to use Swapon as an alternative solution instead of upgrading the memory.
What is Swapon?
Swapon is a Linux command that activates swap space, allowing the system to utilize disk space as additional memory. Using Swapon can optimize memory performance without the need for a costly memory upgrade.
Setting up Swapon on your AWS Lightsail instance
Step 1 - Ensure there is no swap space created
sudo swapon --showWe can also verify that there is no active swap by using the free command.
free -h# Output
total used free shared buff/cache available
Mem: 924Mi 333Mi 115Mi 0.0Ki 474Mi 426Mi
Swap: 0B 0B 0BStep 2 - Create a swap file
CMD ["executable", "param1", "param2"]To create a 2GB swap file, use the following command. The swap space should be twice the size of RAM if the RAM is less than 2GB. If the RAM is 2GB or more, the swap space should be the same size as the RAM plus an additional 2GB.
Step 3 - Secure the swap file
Set the correct permissions to ensure that only the root can access the swap file.
sudo fallocate -l 2G /swapfileStep 4 - Enable the swap file
Enable the swap file so the system start using it.
sudo chmod 600 /swapfileStep 5 - Make the swap file permanent
To ensure the swap file is used after a reboot, add it to the /etc/fstab file
sudo swapon /swapfileStep 6 - Verify the created swap file
sudo swapon --show# Output
NAME TYPE SIZE USED PRIO
/swapfile file 2G 0B -2We can also verify that in memory usage system by using the free command.
free -h# Output
total used free shared buff/cache available
Mem: 924Mi 333Mi 115Mi 0.0Ki 474Mi 426Mi
Swap: 2.0Gi 0B 2.0GiStep 7 - Adjust swappiness to optimize performance
Swappiness dictates how aggressively the system utilizes swap space. By default, it is set to 60, but you can reduce it to minimize swap space usage.
sudo sysctl vm.swappiness=10To make this change permanent, add vm.swappiness=10 to the /etc/sysctl.conf file.
Conclusion
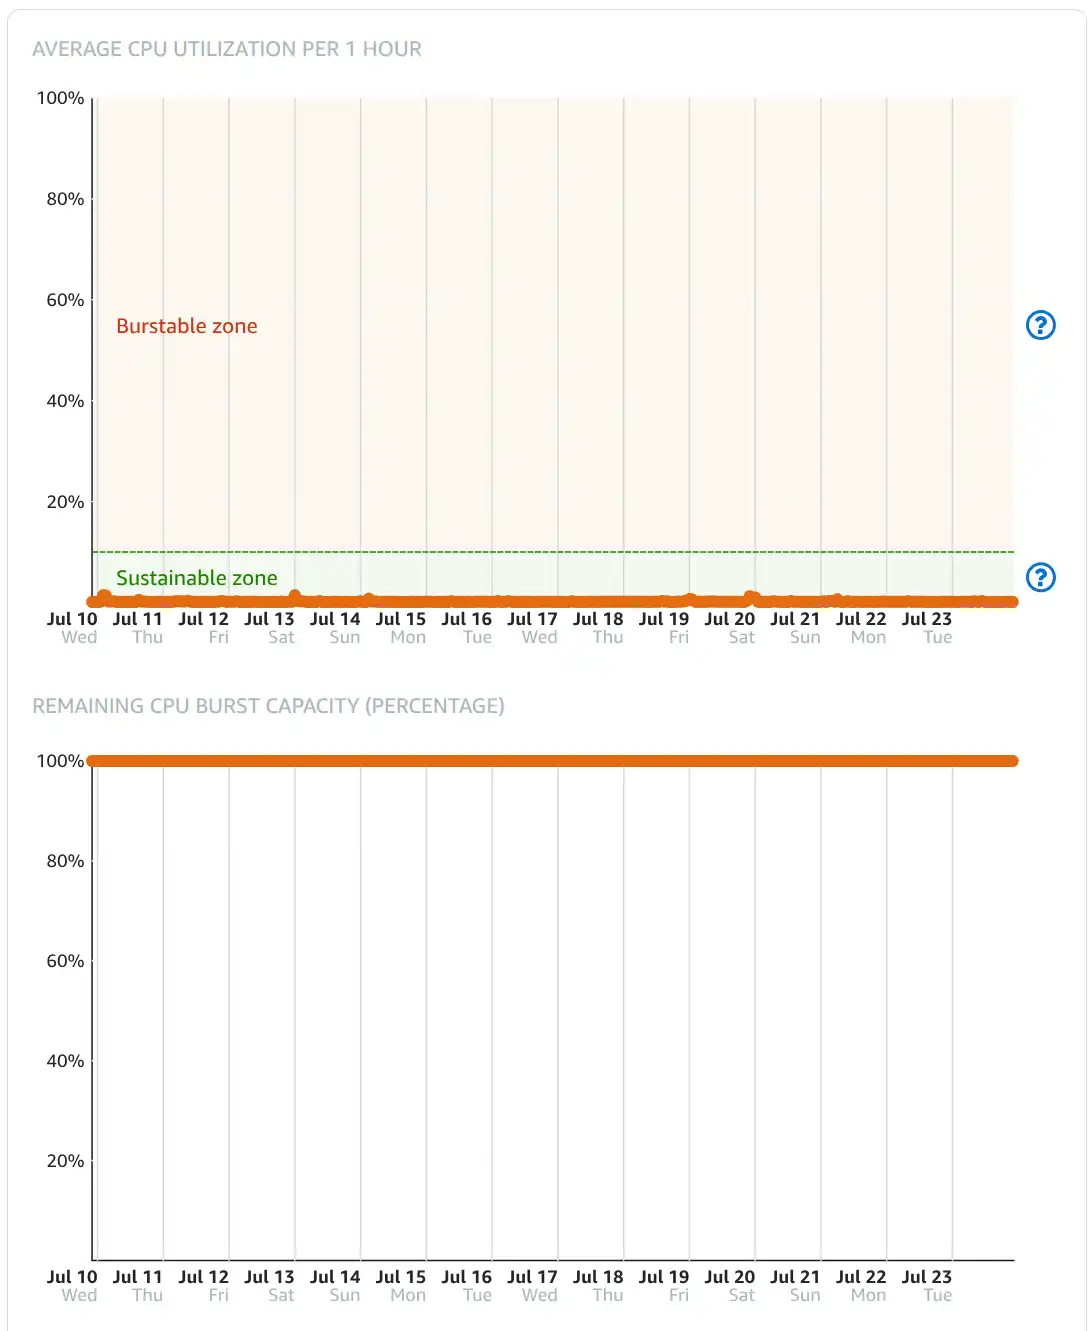
Implementing Swapon on my AWS Lightsail instance proved to be an effective and cost-efficient solution for managing memory spikes and maintaining optimal burst capacity. This approach not only maintains instances during high-demand tasks but also provides a sustainable way to handle memory management. The metrics clearly show no spikes, as illustrated in the graphic below.

Additionally, this experience has highlighted that heavily relying on remote development can be problematic. It is not a good practice for deploying production web applications. As a result, I am transitioning towards a DevOps approach, which will optimize development and deployment processes. I am excited about this transition and share my experience in my next blog post.
This guide can help you resolve similar challenges by exploring Swapon as an alternative to upgrading hardware. This approach can offer substantial benefits and cost savings. Regular monitoring is crucial for maintaining optimal server performance. Implementing DevOps practices can improve your infrastructure by automating processes and making them more efficient. Don't forget to keep an eye out for more updates on my progress toward implementing a DevOps workflow.
Boosting AWS Lightsail Performance with Swapon to Save Your Low-RAM Instance
Learn how to improve the AWS Lightsail instance performance using SWAPON to manage memory spikes and maintain CPU burst capacity without costly updates.
For the passion of automated cloud solutions.
Subscribe to get the latest posts. I mostly write about Backend (Python/Bash), DevOps and Linux.