Day 31: Mastering Terraform Provisioner
Apr 21, 2025
•12:37 AM GMT+8
Provisioners in Terraform allow you to execute scripts or commands on a local or remote machine as part of the resource creation or destruction process. They are helpful for tasks like bootstrapping servers or handling custom setup steps. In this blog, we will explore local-exec, remote-exec, file provisioners, and the flexible null_resource.
A diagram is also included to help visualize how these components connect. You will follow along with a task that provisions an Azure VM and uses each provisioner in context.
💡 Note: Provisioners will only take effect during the creation or destruction of a resource. If a resource already exists and is not being recreated by Terraform, the provisioners associated with it will not run. This behavior ensures that provisioners are used as a last resort and not relied upon for regular configuration management.
Task
As a prerequisite, use the 03-Provisioner folder from my GitHub repository. This contains the base Terraform configuration needed for this task.
https://github.com/git-adrianrubico/learn-terraform/tree/master
cd learn-terraform/03-Provisioner
In this task, we will demonstrate how to use the three main types of provisioners in Terraform:
local-execremote-execfile
We will also explore the concept of null_resource which can act as a container for provisioners.
Create an Azure Virtual Machine
In this hands-on example, we will create a Linux virtual machine (VM) in Azure, complete with a public IP address, network interface, subnet, virtual network, and a network security group (NSG). This setup prepares the VM for provisioning tasks such as executing remote commands and transferring files.
resource "azurerm_linux_virtual_machine" "vm-example" {
  name                            = var.azvm
  resource_group_name             = azurerm_resource_group.rg-example.name
  location                        = azurerm_resource_group.rg-example.location
  zone                            = "2"
  size                            = "Standard_B1s"
  admin_username                  = "adminuser"
  admin_password                  = "P@ssw0rd123456!"
  disable_password_authentication = false
  network_interface_ids = [
    azurerm_network_interface.nic-example.id,
  ]

  os_disk {
    caching              = "ReadWrite"
    storage_account_type = "Standard_LRS"
  }

  source_image_reference {
    publisher = "Canonical"
    offer     = "ubuntu-24_04-lts"
    sku       = "server"
    version   = "latest"
  }

  tags = {
    environment = local.env
  }
}

resource "azurerm_public_ip" "pip-example" {
  name                = "vm-public-ip"
  resource_group_name = azurerm_resource_group.rg-example.name
  location            = azurerm_resource_group.rg-example.location
  allocation_method   = "Static"

  tags = {
    environment = local.env
  }
}

resource "azurerm_virtual_network" "vnet-example" {
  name                = "example-network"
  address_space       = ["10.0.0.0/16"]
  location            = azurerm_resource_group.rg-example.location
  resource_group_name = azurerm_resource_group.rg-example.name
}

resource "azurerm_subnet" "subnet-example" {
  name                 = "internal"
  resource_group_name  = azurerm_resource_group.rg-example.name
  virtual_network_name = azurerm_virtual_network.vnet-example.name
  address_prefixes     = ["10.0.2.0/24"]
}

resource "azurerm_network_interface" "nic-example" {
  name                = "example-nic"
  location            = azurerm_resource_group.rg-example.location
  resource_group_name = azurerm_resource_group.rg-example.name

  ip_configuration {
    name                          = "internal"
    subnet_id                     = azurerm_subnet.subnet-example.id
    private_ip_address_allocation = "Dynamic"
    public_ip_address_id          = azurerm_public_ip.pip-example.id
  }
}

resource "azurerm_network_security_group" "nsg-example" {
  name                = "vm-nsg"
  location            = azurerm_resource_group.rg-example.location
  resource_group_name = azurerm_resource_group.rg-example.name

  security_rule {
    name                       = "AllowSSH"
    priority                   = 100
    direction                  = "Inbound"
    access                     = "Allow"
    protocol                   = "Tcp"
    source_port_range          = "*"
    destination_port_range     = "22"
    source_address_prefix      = "*"
    destination_address_prefix = "*"
  }

  tags = {
    environment = local.env
  }
}

resource "azurerm_subnet_network_security_group_association" "example" {
  subnet_id                 = azurerm_subnet.subnet-example.id
  network_security_group_id = azurerm_network_security_group.nsg-example.id
}
Using Local Exec
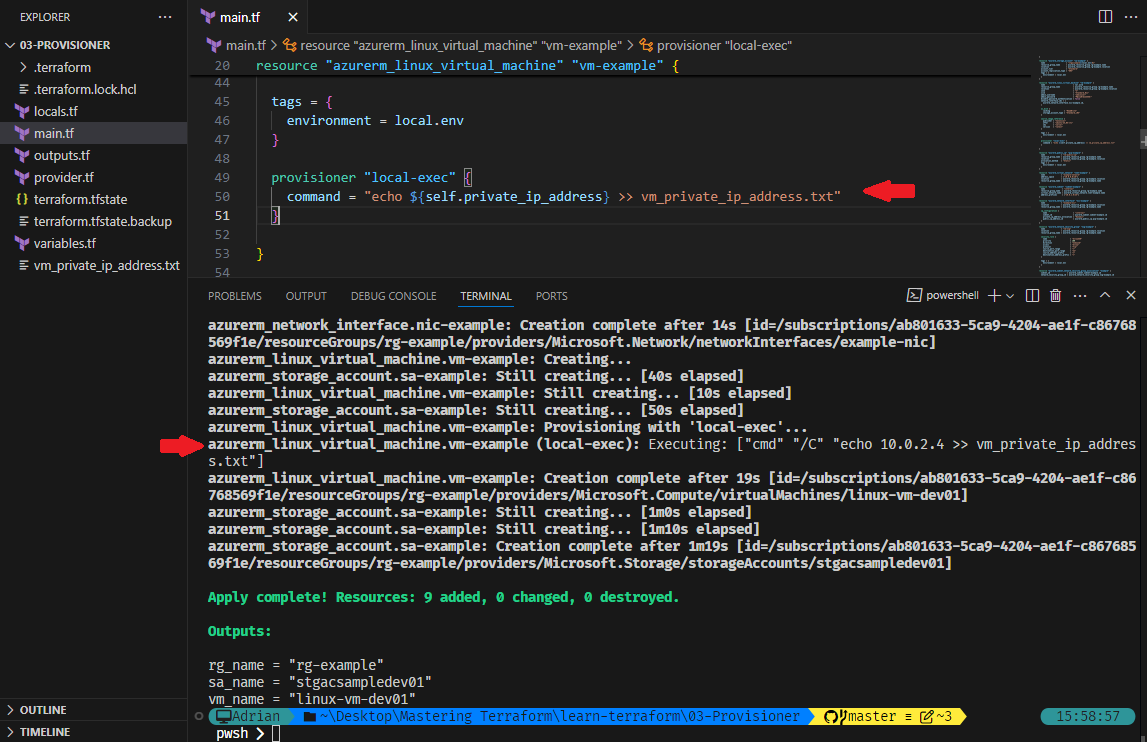
In the following example, a local-exec provisioner is used during the creation of a Linux VM in Azure. It captures the instance's private IP address and writes it to a text file. This provisioner runs locally in the same directory where terraform apply is executed, and only triggers after the resource has been successfully created.
provisioner "local-exec" {
  command = "echo ${self.private_ip_address} >> vm_private_ip_address.txt"
}
Upon successful applied of the configuration, it shows in the output logs of executed command.
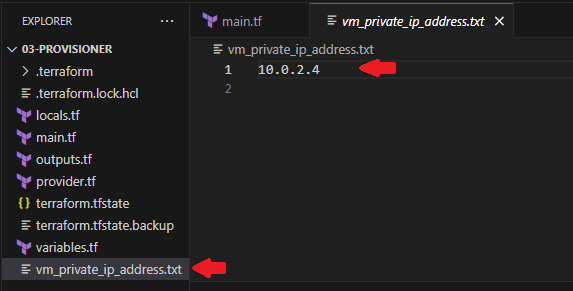
Displaying the output of vm_private_ip_address.txt are as expected.
Clean Up the VM Resource Before Proceeding
If you've already created the Azure VM during previous steps, you must destroy the VM before testing the remote-exec provisioner. This is because provisioners only execute during the initial creation of the resource.
Use the following commands to safely remove the VM:
1️⃣ List the current state:
terraform state list2️⃣ Destroy only the VM resource:
terraform destroy -target azurerm_linux_virtual_machine.vm-exampleUsing Remote Exec
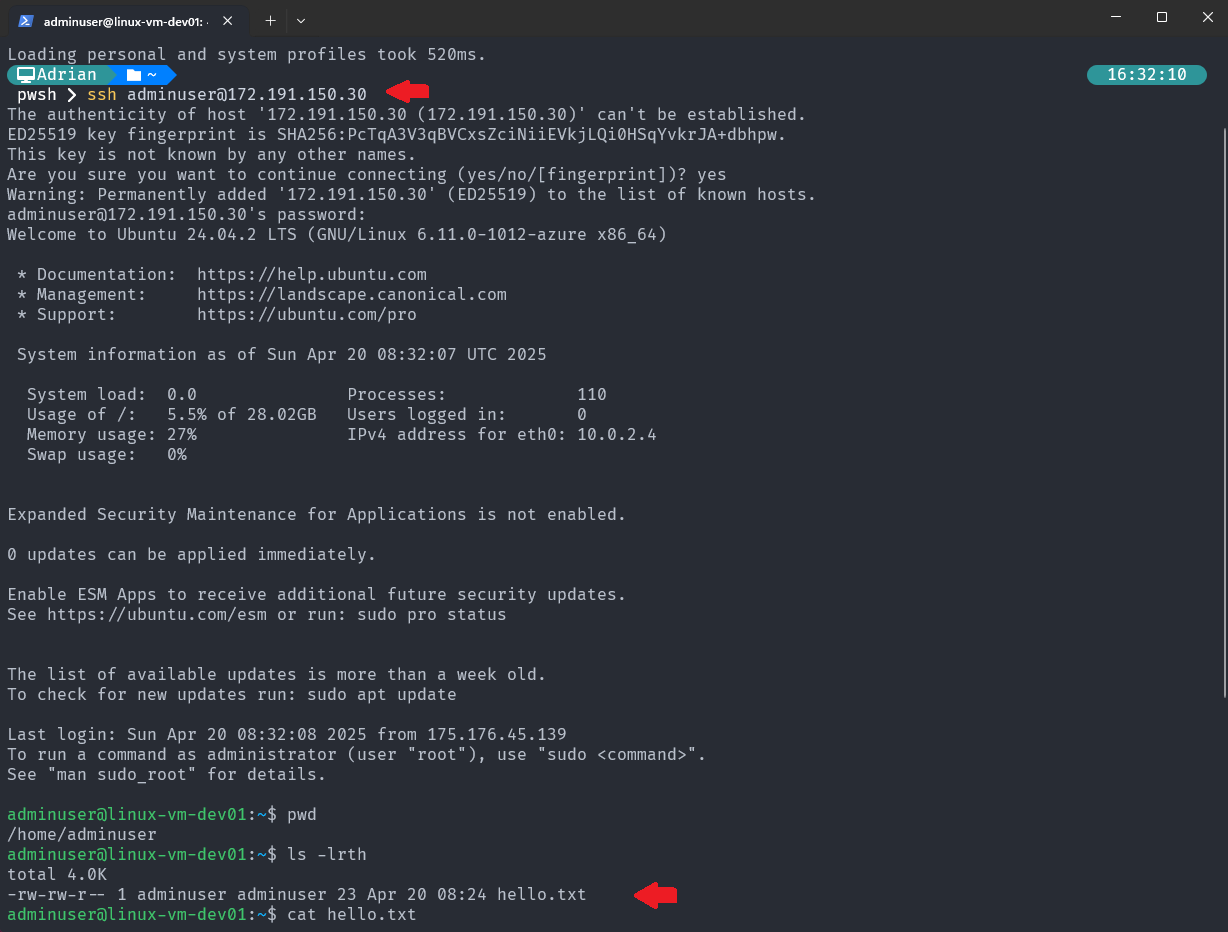
In the following example, as we create a Linux VM in Azure, we use a remote-exec provisioner to execute a simple inline command on the VM after provisioning. The provisioner connects via SSH and writes a text file on the remote instance. This technique is useful for initial configuration steps or verifying connectivity.
connection {
  type     = "ssh"
  host     = self.public_ip_address
  user     = self.admin_username
  password = self.admin_password
}

provisioner "remote-exec" {
  inline = [
    "echo 'Hello from remote-exec' > /home/adminuser/hello.txt"
  ]
}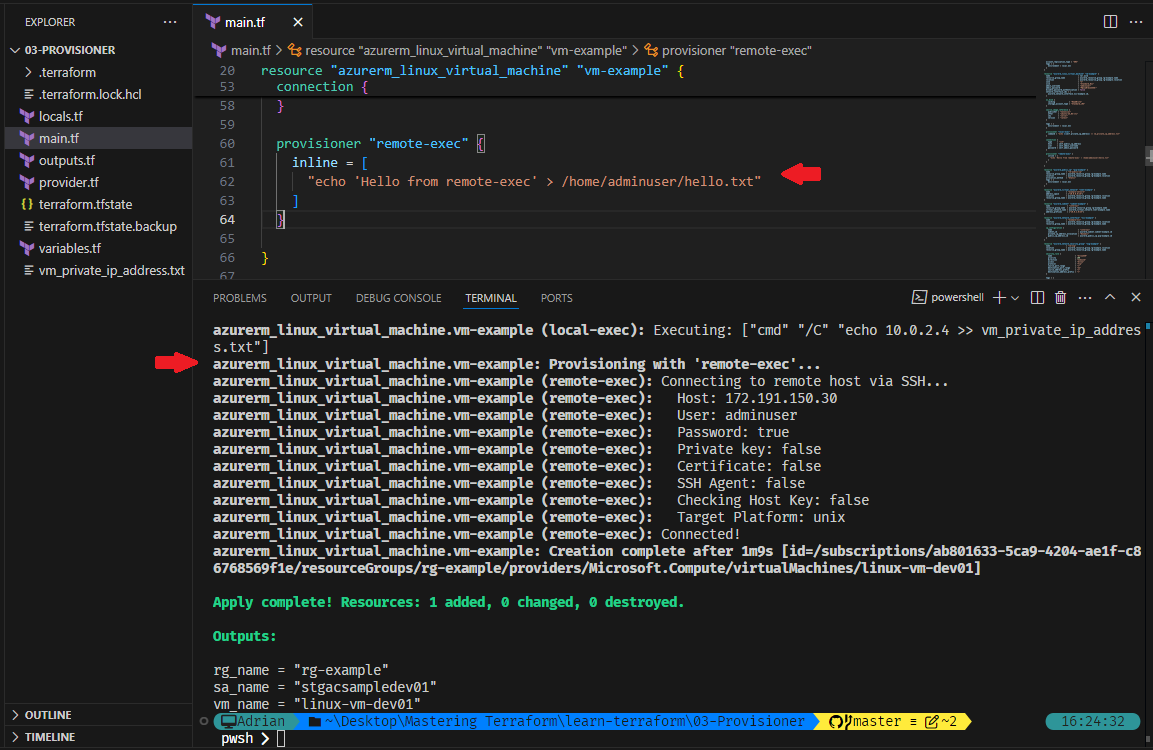
Verify executed script in the Azure VM machine:
Using File Provisioner
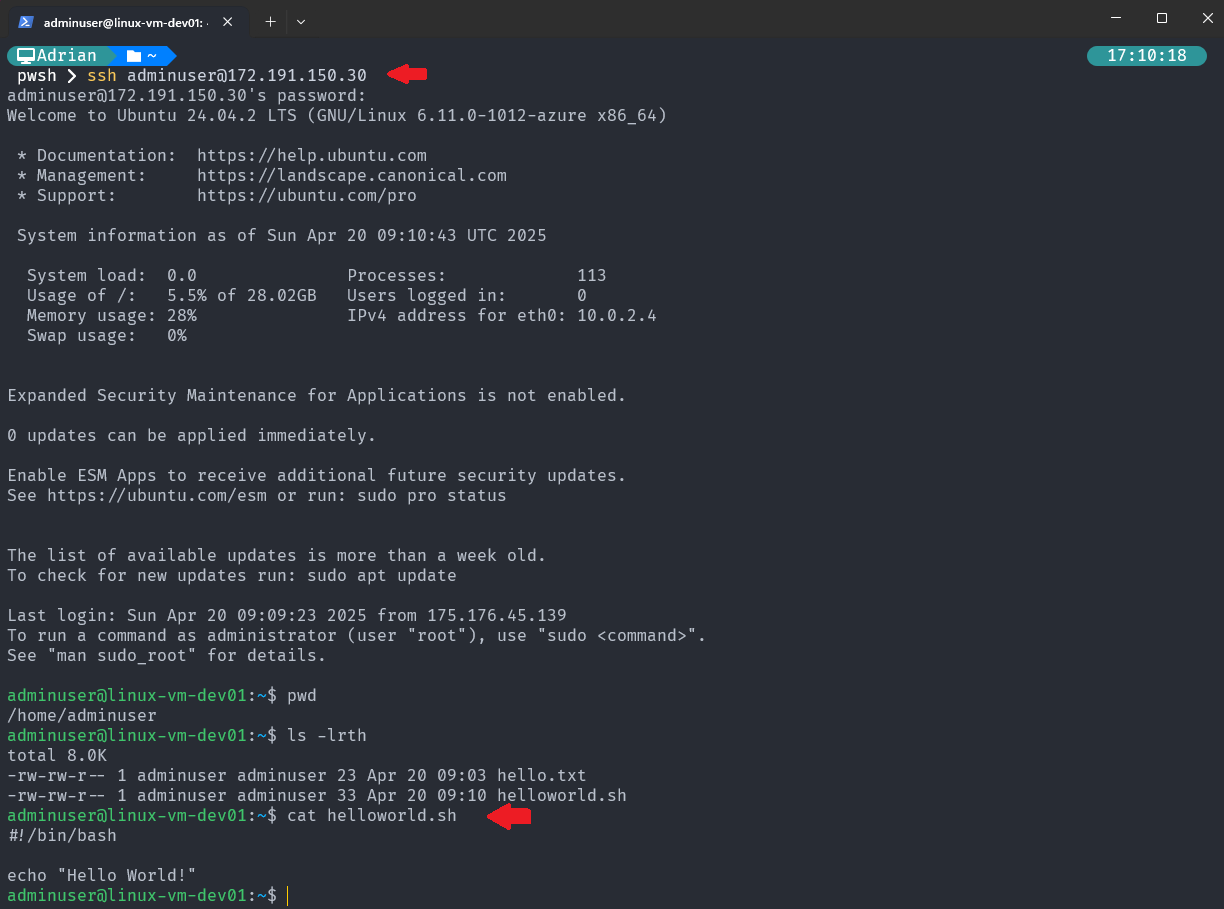
In the following example, we use the file provisioner to transfer a file from the local machine to the remote Linux VM created in Azure. This provisioner is helpful for copying scripts, configuration files, or any other files required by the VM during setup. The file is copied once the resource is successfully created and the connection is established.
provisioner "file" {
  source = "./helloworld.sh"
  destination = "/home/adminuser/helloworld.sh"
}
Verify copied file in the Azure VM machine:
Using Null Resources
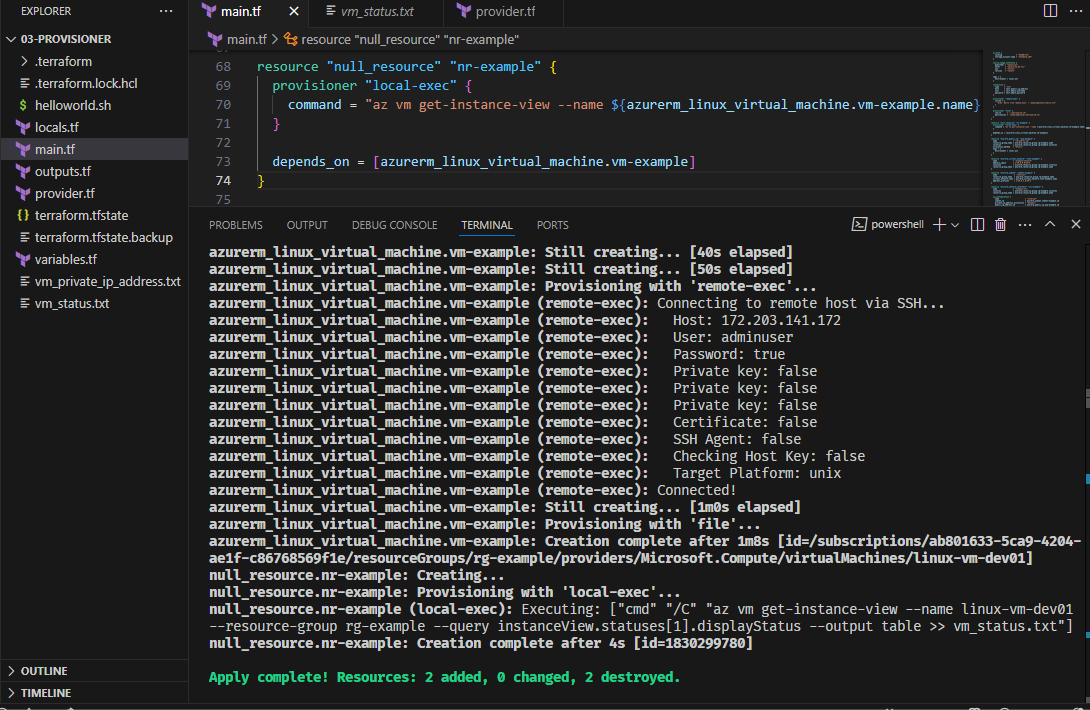
In this example, we demonstrate how to use the null_resource block in conjunction with the local-exec provisioner to execute a command after the VM is created. The command leverages the Azure CLI to query and capture VM instance view data. This pattern is useful when you want to perform custom logic or commands that are not tied directly to a specific resource.
First, update your provider.tf file to include the null provider:
provisioner "file" {
  source = "./helloworld.sh"
  destination = "/home/adminuser/helloworld.sh"
}
Then re-initialize your configuration:
https://github.com/git-adrianrubico/learn-terraform/tree/master
cd learn-terraform/03-Provisioner
Now, update the main.tf file:
#resource "azurerm_linux_virtual_machine" "vm-example" {
# ...
# Please remove the existing "local-exec" with this resource "vm-example" nested.
#}

resource "null_resource" "nr-example" {
  provisioner "local-exec" {
    command = "az vm get-instance-view --name ${azurerm_linux_virtual_machine.vm-example.name} --resource-group ${azurerm_resource_group.rg-example.name} --query instanceView.statuses[1].displayStatus --output table >> vm_status.txt"
  }
  depends_on = [azurerm_linux_virtual_machine.vm-example]
}
Here, depends_on ensures that the null_resource will only execute after the VM is fully created. This is important when the provisioner depends on the output or status of another resource.
💡 Instead of destroying the VM to re-run provisioners, you can use:
terraform apply -replace=azurerm_linux_virtual_machine.vm-exampleThis command replaces the VM only, which can be helpful to trigger provisioners without impacting other resources.
The null_resource can use any provisioner type such as remote-exec, file, or local-exec, which offers flexibility when you want to perform provisioning tasks outside of defined infrastructure resources.
💡 Learn more from these helpful links:
Terraform Diagram
Below diagram ilustrates the different stages of Terraform provisioners, highlighting three types:
local-exec: Runs commands on the machine where Terraform is being executed (your local machine)remote-exec: Executes commands on the Azure resource after it has been successfully created by Terraform.file: Transfers files from the Terraform host to the Azure resource
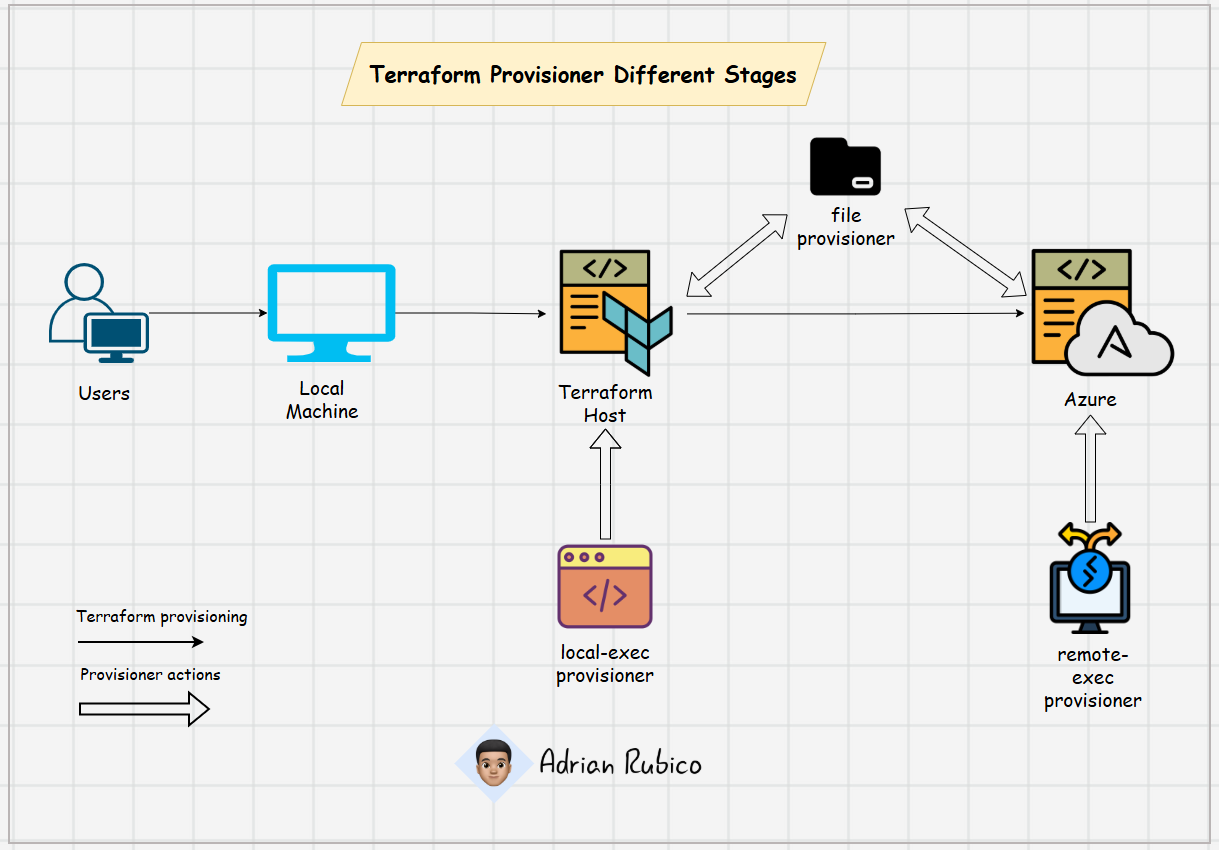
These provisioners automate setup tasks during infrastructure deployment, bridging the gap between local configuration and cloud resource initialization. The stages span from the user's local environment to Terraform's execution and finally to the Azure cloud platform.
Conclusion
In this blog, we explored how to use Terraform’s local-exec, remote-exec, and file provisioners. We also demonstrated the power of null_resource for running provisioners that aren’t tied to a specific infrastructure resource.
Provisioners are helpful for one-time configuration tasks after resource creation. The null_resource adds flexibility by supporting any type of provisioner without requiring a specific resource.
In the next blog, we will explore into Terraform Data Sources, which allow you to reference and use existing infrastructure details to make your configuration more dynamic.
Day 31: Mastering Terraform Provisioner
Explore Terraform provisioners local-exec, remote-exec, and file provisioners, demonstrating their use in provisioning an Azure VM, with the null_resource adding flexibility for custom configurations.
For the passion of automated cloud solutions.
Subscribe to get the latest posts. I mostly write about Backend (Python/Bash), DevOps and Linux.